My most valued possession is my family. Even if you are living in a box
somewhere, and you have the love and support of your family, you will always be
wealthy. Love really is all you need. From love, great things will emerge. From
your thoughts, you can create greatness.This is what I need to remind
myself of everyday to be the best person that I can be. Live your life with
gratitude. Be thankful for all that you have everyday, even if it is your eyes
to see or your ears to hear or your feet to walk or your hands to create.
Understand your place in this Universe; how infinitesimally small you are, but
how huge a contribution your Spirit is. Don't wear blinders to the world around
you, you're not the only one here. Be kind, considerate, don't be judgmental,
love others, and yourself. Know that you are perfect inside; that you are
love.


Wednesday, June 18, 2014

A Burlap Wreath For All Seasons


Hi there!

Here's a project I did this past fall (I know, I know...) and I wanted to share it with you (finally)!

Better late than never, though, right?

It's actually a wreath that can easily be transformed to fit whatever occasion you need because it's so easy to change up!

The things I used were really quite simple to come by. I like to try to pick up some rolls of burlap whenever I am at Hobby Lobby. It's cheap ($4.99 for the natural color, but they sell other colors, too and if you happen to have a 40% off coupon...why not get some?) and they keep it stocked. 

Even Walmart has been stocking this now in different widths, colors, and even patterns, but I'm sure with the massively growing popularity of burlap, you should be able to find it anywhere. Bridget, of LittleLovelyLeaders.blogspot.com, a blog for teachers, made the tutorial I used and she got her burlap from Michael's.

Anyway, my point is, I've always got some on hand. I also had the brown chenille ties, so that's what I used to hold it all together. The only thing I had to go out and buy was the metal wreath form. That was at Walmart for just a couple of bucks. 

That's it! No glue, and hardly any scissor use, except for cutting up the chenille stems into 3rds...


I got a little ahead of myself before I took the first picture, but you get the idea of what the wreath form looks like, right? 
This is how I attached my burlap...

I didn't use as much burlap as Bridget's how-to, so my instructions are a wee bit different than hers. If you don't have as much burlap ribbon on hand, or want to save a little money, this is what I did.

I followed the tutorial exactly and attached the end piece of my burlap to the wire using a piece of the chenille tie by poking it through the burlap on either side of the wired wreath form and twisting it tightly in the back.

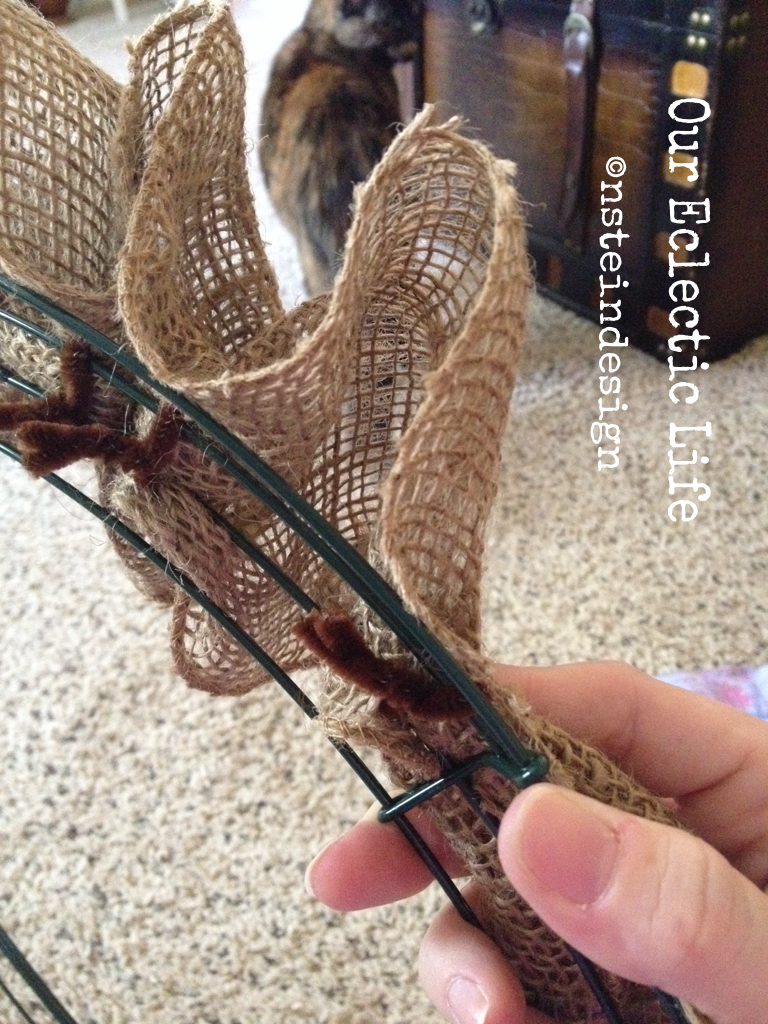
Then, I just scrunched up the burlap, making loops in the size that I wanted, and attaching those as close to, or as far away from, the last piece that that I had tied onto the form with a chenille stem, until it looked good to me. I just sort of pinched my burlap, pushed the chenille through the holes in the fabric and slid it up and down on the wreath form until I liked where it sat, then just twisted the chenille tightly in the back to secure.


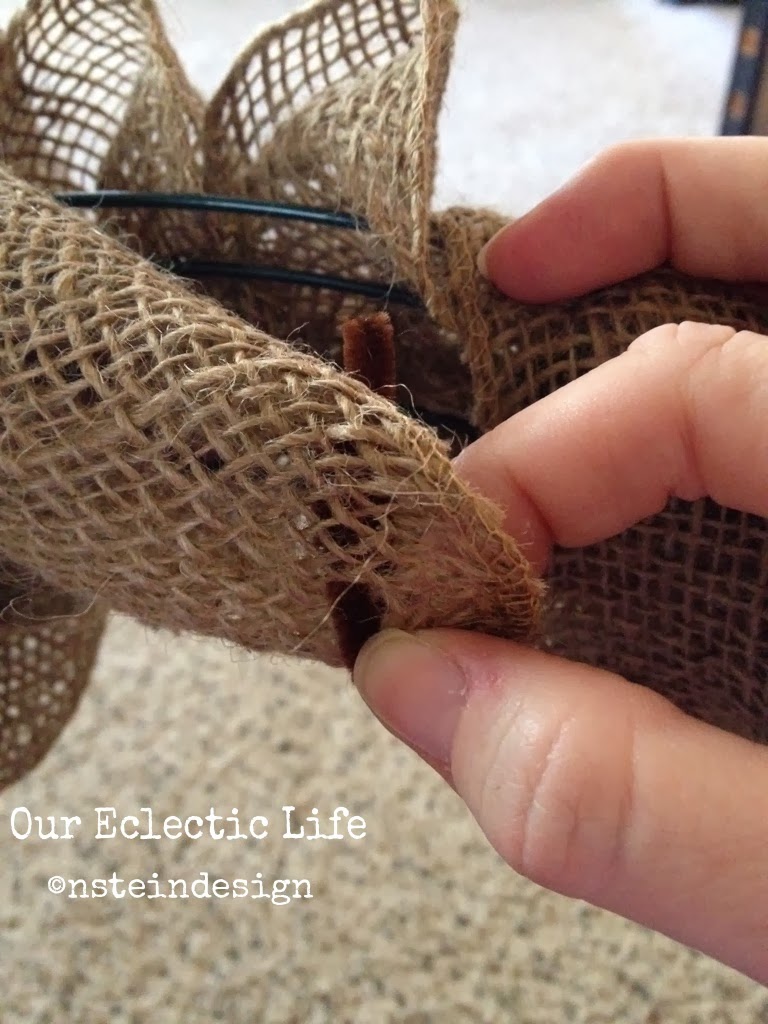
Here is a back view of what the chenille looks like from behind. When you make your loops, you want to make sure the next one is attached at least close enough to hide the stem on the last loop. Make sense? 


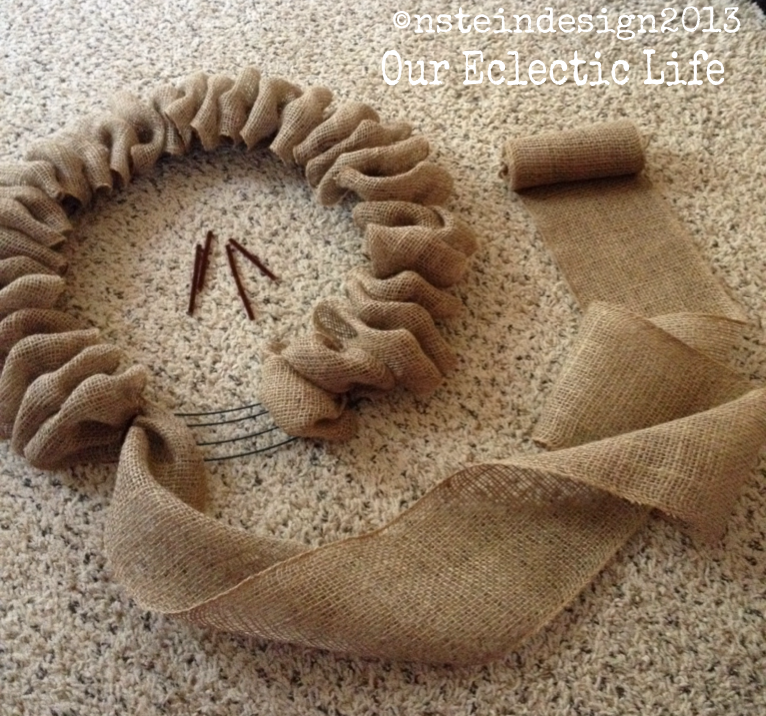
This is what it will start to look like. Mine is not as full, because I didn't use as much burlap, but I'll show you how I fixed that without using a ton of rolls and driving up the cost of this project!


Amazingly, I only used one roll of burlap, and this is how I did it.

I knew I wouldn't have enough to make it evenly full all the way around with just one roll, so, I gauged how much I needed as I went along. I won't lie...I did make a couple of adjustments along the way. Then, when I got back to where I started, I simply started to twist the roll on itself, like you would crepe paper streamers, and loosely wrapped it back around the wreath sort of filling in where it needed it and making sure to cover any visible chenille stems. 


When I got to the end, I poked a stem through the underside of the "tail" end and attached it to the wreath form, making sure it was hidden (even though it's the back side, I don't care for 'unfinished edges').


I twisted it onto the form and tucked it under another fold of the fabric.


                                                                   All hidden away!


Here's the back side of the wreath with the twists of burlap covering the chenille ties and exposed metal wreath form...


And here's the front all filled in! 
I just fluffed it up and it's ready to decorate.


Next, what to decorate it with?

It was Autumn and I had just gone on my yearly pumpkin and gourd picking trip with my sister. There is a little farm that grows a wide variety of  squash and sells it roadside for cheap! It's in a little town about 40 minutes from us, but the drive is lovely and I love helping a local small business out. 

Aside from all the unique pumpkins and gourds, they had this beautiful shellacked Indian corn. There were so many beautiful colors and bundles, I couldn't decide!


I finally picked this bunch; it was the most colorful.

The corn was already bound together with heavy gauge wire, so I just wrapped jute twine around the wire a few times to hide it and worked some twine through the wired wreath form to tie it on. After making sure it was sturdy, and a few adjustments for aesthetics, I tied a little raffia around it and I was done! 

The whole thing was easy to hang onto a wreath hook because the wire wreath form was so compatible. 


                                                      Just look at all those beautiful colors!


What also sold me on this bunch was the fabulous striations of purple throughout the husks! Just beautiful...


 Each piece is like a little fingerprint...no two are alike...


Is anyone else as excited as I am about each little kernel of this corn?! 


Call me crazy, but I think it's beautiful ;)


If you've been longing for a burlap wreath of your own, I hope you will try making this for yourself. It's not as hard as it may seem and is quite cost effective, since you can change it up to match whatever decor you are into at the time, so it's really worth it. Let me know if you decide to try one and send me a picture of how you decorate it!


I want to say thank you to Bridget, at Little Lovely Leaders for her original tutorial on this burlap wreath how-to. Be sure to drop on over to her blog for more great ideas!

Thanks for stopping by today, and have a great week.

Nanette


* All opinions are my own. I receive no endorsements from any sponsors mentioned in the above post:     Hobby Lobby, Walmart or Michael's.
Friday, June 13, 2014

My Very First Go With Annie Sloan Chalk Paint®

Hi Guys!
I have been dying to get my hands on some of this stuff. I've heard about it for so long but never had: 

    1. the money (I thought, because you know I've spent $$ on stuff I could have otherwise been spending on this delicious paint) because at about $38 a quart, I was always too terrified guilty to buy it. Not to mention the wax, brushes, etc... 
                                                              
 2. the courage, because it looked way too involved with all those steps, and what the heck is "waxing" over paint, anyway...?  
                                  
 3. the projects. I have bought several wonderful pieces for WAY to little money at our local small town flea market, antique store, and second hand store. Yes, I said "little". I must be doing everything right, because wait until you see what I have, but that's for another post...It's just one more reason I love my little country town...


Anyway, last week we were in one of our absolute favorite places, Historic Down Town St. Charles (Missouri), to have lunch and as we left the cafe a little shop right across the street caught my eye. Toodaloo is a shop that specializes in repurposed furniture and lovely vintage and handmade finds. They also happen to be a stockist of Annie Sloan Chalk Paint® (ASCP). We had been in there before, and I browsed the chalk paint but was too shy to buy. This time I walked in with purpose. After talking to the lovely lady covered in paint (she was painting a large and beautiful dining table) I decided upon a can of "Old White", the most versatile of colors. I had already purchased some Minwax at Lowe's for other projects, so I thought that would be fine, and I didn't buy any brushes, either. I wanted to experiment first. 

So, I left with my purchase, it was about $42, tax included, and we headed for home. 


I knew what I wanted to do first, just to get a feel for the paint. I have a bunch of these resin candle sticks. I've had them for years, purchased in a group. I have 5 left, one fell and broke. I also got all of my mother's home decor after she passed, and she had a few of these in a light brushed gold color. I didn't get a picture of the two I actually painted because I literally just jumped right in as soon as I got home right there on my stove, but this is the exact color that they were; same group. 


Look at all that detail! I was so excited to get started... So excited that I forgot to show a few pictures of how I painted these. Maybe it's time I jump on the "YouTube" bandwagon. I painted these last week before I watched any tutorials. But after I painted the first one (with the WAY wrong brush) I searched out some tutorials. I found this great series from Blue Egg Brown Nest writer Christen Bensten on YouTube. I'm so glad I found this tutorial series (there are 5 videos in all for this tutorial on how she painted a dresser with ASCP) because I needed the instruction!


These are my candle sticks all painted up. The one on the right I painted with a sponge brush. *Sigh*...Don't do this. Just. Don't. Okay, it wasn't horrible because, as you can see, I got it painted, mostly. But, this paint dries fast. On your project; on your brush. But, if you've ever painted anything with a sponge brush before, you know the texture it leaves, and, with this pant, that's fine; you really kind of want a little texture, unless you want smooth, then you might want a different paint altogether ;) Anyway, the problem was that the sponge removes too much paint as you go. It doesn't leave what you want behind.
So, I watched a tutorial. Saw this big, fluffy, round, juicy brush being used...on a dresser. I'm doing candle sticks. That wouldn't work, even if I had one. But--I have a slew of paint brushes in my craft room, craft maven that I am ;)


There's my wicked little sponge brush...and my cheap little savior; the cheapest you can find. It came in a pack of multiple paint brushes, all different sizes and styles from Michael's or Hobby Lobby. You know the ones? Well, it worked just fine, for what I needed, but it shed like crazy. Last night I discovered another tutorial that I also found so helpful. Even though Christen (Blue Egg Brown Nest) said you could use a cheap brush from Home Depot, this second tutorial helped convince me with my "Yeeahhh, but...you've been doing this a long time, you could probably use any brush" mentality. Sort of a second opinion, if you will. You should check out her newly budding blog and her very informative and easy to follow YouTube tutorials. Her name is Christina--I just noticed both my little "inspirations" names are so similar and the same as one of my besties, too, lol--and her blog is Pretty Distressed. Her newest post was one of those "synchronisticmoments I'm always talking about. Anyway, you should check out her tutorials either here or on her YouTube. You won't be disappointed.

Okay, props given.
Next, I went into the "place-which-should-not-be-named"...the basement. I don't like our basement. Our house is 116 years old. It's dark, it's damp, the floor rafters overhead ceiling is low...no place for a girl.

But, down I went. I needed the wax and sandpaper. One thing that basement is? Organized. Thanks, Babe!


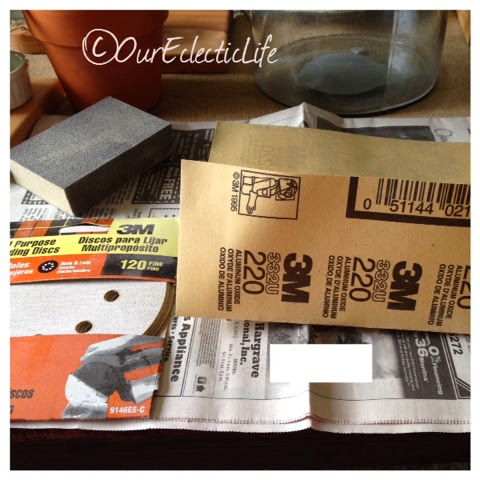
I grabbed a variety of what I thought I needed out of the "Sandpaper Drawer". A universal type sanding block that I could not find the grit # of on the packaging, a sheet of 220 grit sand paper, and I just grabbed some 120 sanding discs, just in case, because I didn't want to go back down there. I ended up using the sanding block and tore two little 2x2" pieces from the 220 paper for the little detail work.

I started out testing a few spots with the 220. It wasn't really strong enough. So I broke right into the sanding block. That did the trick, but I used a light hand, until I got the 'feel' for it. Then, for the smaller details, I used the little bits of 220. This will vary for each of your projects depending on how many coats you put on, how thick or textured you paint it and how distressed you actually want your piece. There will be some pieces I'll do that I won't want a lot of distressing on, so I'll either go very lightly on it or maybe not at all. There is no wrong way. Apparently you can just paint right over all of your mistakes, even after waxing. That's why Annie Sloan is an absolute genius in my eyes and my newest Hero.

Sand away until it feels right to you. I was doing such a small project, so I didn't wear a mask, but for more sanding, I just might. It doesn't create a lot of dust, but this paint is literally like chalk. Annie Sloan invented this in 1990, so it came way before chalk BOARD paint-not the same thing-so it is super soft and is just like shavings from an actual piece of white chalk. One thing to be careful of is your fingernails, if you have them. Watch that you don't scrape any of the surface with a nail as you are curving around with your sandpaper. I sanded on my dining room table over a news paper into a little bowl. The dust was heavy enough to fall right in. I also used the natural bristle brush I painted with to dust my piece as I went along (after I washed and dried it, of course).


Here are a couple detail shots of just how heavy or light you can go with your sanding. You can just nick away some of the paint so that only a little of the bottom color shows through, or go a little harder to get all the way down to the wood.


There are so many techniques to this, you really do have full creative control. Some will wax before sanding to take away less paint, some use the dark wax to distress a little more. I didn't have dark wax and was really just getting a feel for what I like, so these are the steps I used. Again, there's really no real 'right or wrong' from what I've gathered, so far, but I'm still learning...


When I was satisfied with the sanding, it was time to wax. I was a little scared, but getting braver all the while. After I watched the tutorials (that I linked for you above) and learned the ins and outs of the waxing process, I remembered I had these Martha Stewart stencil brushes. I bought them to stencil some pillows, but didn't really like the effect I was getting. Now that is something a sponge brush is good for. I went up and pick the two that I thought would work the best. There are several sizes in the pack of 6 or 7 brushes.


I opened my Minwax and discovered that, not only did it have a smell, it had a 'tint'. Not clear like Annie Sloan's. I was told by the clerk at Toodaloo's that the wax should be like Crisco. This was a bit harder than that...at first. But you know what? My brush rubbed around in it just fine. It was definitely soft enough. I just circled my brush around in it and wiped the excess off onto the side of the can from the side and 'bottom' of my brush.


I just started on the top of the candle holder, where the candle would sit, and circled the wax in. It went on exactly as the girls said it would. Though I could tell it was ever so slightly tinted, it didn't detract from the piece. I will be getting the AS Clear Wax very soon, though. I have some major projects coming up!


I would brush the wax in to an entire section, like the whole top, then buff it in with a rag. This is definitely where the elbow grease comes in. Even for this small project, it was a workout. I used a terry washcloth and that seemed to work just fine, but I'll use something softer next time. I am quite impatient and just wanted to grab what I had.


 It worked out well because I was left with exactly what I was promised.


I finished both pieces, buffed them very well, and put them out. With a bigger project, you will want to let your wax 'cure' for at least a day, but I found these to be hardened and there were no sticky or 'rubby' spots on it after a few minutes. The finish is hard as a rock.


Here are a few pictures of them incorporated into my decor. I just made those little felt flowers for the candles a few weeks ago. There'll be a post about those soon, so keep an eye out!


Wouldn't Annie Sloan Paint have been great on this Painted Photo Block project from a couple of weeks ago? I totally think so, too. The things we wish we would have known...


I had so much fun experimenting with this lovely new product. I absolutely can not wait to get going on some bigger pieces. I will give you a little sneak-peek of what I will be working on real soon...


I can't wait! Until next time, go check out those great blogs I linked up top and let me know what you thought about this post right down below there in the comment box...I'd love to hear from you!

Have a great weekend and Father's Day! Spend some time with the daddy's in your life making memories. That is the most important thing in life...

Thanks for reading,


Nanette

Wednesday, June 11, 2014

My Intimate Evening With A Man Named Rod...

As you may very well know, so much happens in my life, sometimes I just long to get away. I need to get away. Let me start by saying that this was my sister's idea. I like Rod Stewart. I enjoy the occasional Santana jam. But enough to have bought tickets on my own? Or take a vacation day from work? Not likely. Well, maybe I would have went with Noah, on a Saturday. But, anyway...my Sis is a life-long fan of Rod Stewart. I was like, three years old when "Do Ya Think I'm Sexy" came out. I remember seeing him strutting around on stage on our little bitty color TV and my sister going wild and my Mom being there. I remember this so vividly. I always have. I also remember thinking I was watching something I probably shouldn't, lol. So, a couple of months ago I picked up tickets for my sister and I to see Santana and her all time favorite--Rod Stewart. The last time we saw him was at the outdoor venue the "Riverport Amphitheater" (now the Verizon Wireless Amphitheater) of St. Louis, Mo. in 2007 (also her request). We had lawn tickets, but halfway through the weather looked like it was taking a turn--for the tornado--and a man and woman approached us and gave us their tickets for something like the 10th row! Well, the weather stayed calm and we had a great time.

But, I digress...

THIS show? This show was fantastic! I mean, I think I was one of the youngest people there...

(Just look at those sweet little heads!)

And thank goodness, too, because as I get older, I do NOT want to deal with the concert-goers of my own youth, you know what I mean? I'm no fuddy-duddy, but lately I just find myself a little 'not-so-in-the-mood'.


Anyway, our seats were pretty great. Far-ish, but great. Right on the isle, no one in front of us, clear access to the stairs. The very steep stairs. Have I mentioned I'm afraid of heights? I have terrible anxiety about being up far and falling.


This is the best my phone could do, the lights on the stage was just not that compatible (probably to deter those of us who wanted to capture our memories). I don't know what kind of phone the lady catty-cornered to us had though, but I should have zoomed in on her screen...because she was getting remarkable photos and even video (gasp!), but  this is the best I could get. No cameras were allowed, except maybe for the 'Press". Hmm...that's an idea... Anyway, this is the close-up of Santana'a set. The stage set-up was fabulous. The band was fabulous. Santana himself was fabulous. He put on a great show. He had two male singers with him, and a whole slew of instruments, as if he needed it. He spoke to us often about living life without fear and being a 'little crazy' or, as he calls it "Foo Foo". He answered the question I think we were all thinking, "What do you and Rod Stewart have in common (to be playing on the same ticket)? We both play black music for white people." I never knew he was funny. He performed the songs we have all most likely heard, "Black Magic Woman", though he didn't sing it, "Oye Como Va", "Smooth" and "Maria Maria". I've never seen little old ladies move so much in my life, like the ones down and to the right of me. Some of them came in with canes!

A few things we were surprised with during his show,which I didn't get photos of, was his introduction of music legend and St. Louis native Ronnie Isley of the Isley Brothers for an impromptu jam session, which caught Mr. Isley completely off guard. It took him a minute to get his bearings but when he did he honored us with a little montage of "It's Your Thing" and "Who's That Lady".  Santana also introduced his wife and touring drummer, Cindy Blackman (Santana) to play a song with the band, and while he snuck away for a much needed break, she broke out into one epic drum solo. It made for a fabulous night.


Try as I might, I could not get good photos of Rod's stage set-up. But I'll try hard to describe it to you. First off, it was classy. 60's retro classy. All glossy white and minimalist. He had a drummer centered up in the back on a riser. The drums were enclosed in a drum screen, for affect, I assume, and there was a female percussionist off to the side with two conga drums, tambourines and a snare. There were three female back-up singers (one of which is related to Mr. Isley--I guess that's why he was in the audience...he did perform a duet with Rod a while back, though--Thanks "Wikipedia"!) in red fringe dresses reminiscent of Tina Turner in her Ike and Tina days, and a female sax and trumpet player. He had three male guitar players, who looked awfully sharp in their very tailored, shiny grey suits and black ties. The stage was set so well, classic and clean.

Then the man himself came out. Black pants, white shirt, blue tie and yellow jacket. Oh, and red socks. I can't forget those red socks.

He got us going with "Infatuation" and kept it up with "Having A Party", "You Wear It Well", "Some Guys Have All The Luck", "Tonight's The Night", "Forever Young" and even a throwback from his old band 'Faces' with "Stay With Me". There was the huge screen up top, that we could all see him on, but there was another screen that encompassed the entire back wall, with four smaller screens in front of that. During the show there was either old footage of him in concert throughout the years, or of his exquisite Football (soccer to us) days or wild but tasteful graphics playing.  At about the mid-way point he brought Santana back up for a duet together for "I'd Rather Go Blind"...that was a treat.


In between songs, Rod had a lot to say. He reminded us that the night of the concert-June 6th-was "D" Day. He thanked the brave souls that defended us during that time, 70 years ago, and those who continue to do so today. He said, as the large screen behind him showed video footage of our current day service men and women coming home to their families and children, "Bless their cotton socks" then broke into "Rhythm Of My Heart" with additional WWII footage playing for us. By the end of the song, the American flag was displayed across the big screen behind him. It was a touching and honorable thing to do.


For his break his back-up singers proved I was spot on with the Ike and Tina reference. They came out in sequined teal dresses and performed "Proud Mary". They put on quite the show of their own and, though it wasn't the Legendary "Queen of Rock and Roll" herself, they did not disappoint.


Then Rod came out all blow dried and in a new gold suit. He spoke a little more, and apologized for his voice. He said "...there's no particular reason, it just comes and goes as it pleases. And I live so clean these days. No smoking or drinking..." He spoke about how the last time he was here was in 2007, and that he has a three year old now. But he says that's it; he's done. "I'm putting up my cue; put my banana back in the fruit bowl." He messes with his hair a little, "Can't do a fing wif ma hair today. I'm havin' a ba' hair day." (that's my go at a British accent).

Now, let's be real. Rod Stewart is 69 years old. I would have never been able to tell about his voice. I heard nary a crack...and with those shakes and shimmies he was doing up there...? Yeah...he's still got it.

He introduced his fiddle and harp players, both females, and a few members of an orchestra from St. Louis who played with him and his band for "First Cut is the Deepest", "Reason to Believe" and "Have I Told You Lately That I Love You". His voice did indeed give out on him during this performance, just once, and he rolled his eyes with an embarrassed and apologetic little smile and a shrug and kept going. The crowd went wild with support. It's hard to get annoyed with a legend...especially when he has been nothing but cordial, kind and absolutely humble.

Next he brought out St. Louis native and "a man who was in my band about 200 years ago", guitarist Billy Peek. They performed "Sweet Little Rock 'N Roller" together while old footage of them "back in the day" played on the big screen behind them. Billy even did the T-Bone Walker/Chuck Berry/(Marty McFly...lol) duck walk like he did on stage with Rod many moons ago.

*I have to tell you right now, as I sit in the place where I am writing this right this moment, Santana's "Oye Como Va" is playing. That's funny.

At one point Rod came back out in a new outfit: brilliant blue skinny jeans, a wild printed blue and green shirt and low profile green kicks. As he came out he was saying...something...but I didn't catch what because he then reached back and dislodged the bit of britches that was creeping into the unknown, with a comic shake of the leg to boot. Oohh...so that's what he must have been talking about! He had us all look at the big screen for a while so that he could show us some funnies. There were a few pictures of him very comically dressed as women, and then he showed us what I am guessing were some of his favorite YouTube videos including the one where the dog knocks the lady down...you know what I mean? Well, you'll have to search that one out for yourself.


He spoke a bit, and on the screen came the words "Rod would like you to know each one is signed personally by him" and out came the soccer balls for the traditional Football kick. Did you know Rod is a huge Football fan and played for his school? As he sang "Hot Legs" and played footage of him playing when he was much, much younger, he expertly kicked those signed balls far into the crowd. It was fun watching people catch, and clamber, for those mementos.

He sang "Maggie May" and concluded it with jumping jacks, and was strutting across the stage as the curtain fell....
The curtain went down, but the house stayed dark. We knew it wasn't over so we all just sat tight. I know what I was waiting for...

Then the curtain came back up and his whole entourage was lined up across the stage with Rod donning a cowboy hat as the intro for "Do Ya Think I'm Sexy" started. Yes! What a performance...

About midway through this classic song that I remember as one of my first ever (Elvis excluded, of course) balloons rained down on the audience who batted them all around the arena, they even made it up as far as we were. At the conclusion, he thanked us, his 'friends' and said goodnight.

So...do I think he's sexy? Yeah. I do. It was a stellar performance by a stellar performer. He was humble and appreciative, kind and engaging. And, boy, can he still move...

Needless to say, we thoroughly enjoyed ourselves. We were making memories. Good ones. There haven't been very many of those, lately, and it's important. Everything else in life, the day to day, the grind...is just filler.


Thank you so much for visiting with me today. I truly appreciate you. And I hope you liked my little review of my night out with the infamous Rod Stewart. If you did please feel free to share it along!


As always, have an exceptional week...

Nanette

Tuesday, June 3, 2014

Vintage Book Paper Wreath

Hello again!

I hope you had a great weekend enjoying the beginnings of Summer. I wanted to share another post from a few months ago of this great vintage book paper wreath I made at Christmas time. I searched through my favorite craft pinning site (a gold star for whoever guesses what that is) and came across several beautiful wreaths to choose from. I picked this one from jadeflower. I put my own twist on it and this is what I came up with. 

For some reason this year I had a little trouble remembering to take photos of the step-by-step processes I took for many of the crafts I have posted. Shame on me. Really, though, because that's the most important part. I guess I was just so harried for time, I forgot. I'm usually a stickler for these things, just look back in the blog and see for yourself. Go ahead...I'll wait...

You back? Find anything you like back there? I hope so! 

Anyway, I'll try to make it up to you with my future posts. I've got a lot coming up. There might be a French chair make over, a couple of side table make overs, a couple of cane back chair re-do's...like I said, I've got plenty of opportunities to make it up to you. 

This wreath was originally made for the Holidays, but I have left it up in my kitchen (away from the stove so it doesn't get splattered) since Christmas and it still 'works'. 

I went to a yard sale the Autumn before and bought up a bunch of their books on the last day, right before close, so they were an absolute STEAL! Now, I don't necessarily condone damaging books, but these were yard sale finds and were already pretty old and damaged. I bought several that I kept for entertainment, as well, though.

Anyway, I got all of my materials ready that I needed for my wreath:

* Tons of book pages. You want to make sure you have plenty on hand to go through so there is a variety of page colors, edges, and actual prints to choose from. (note the fox, chapter numbers and titles I worked into the folding process)

* Glue gun and glue. In the tutorial link above, she used a glue stick. This is fine, it will hold. But, from my scrapbooking days, eventually anything I glued with a stick came loose after a while. Tacky glue will definitely hold-forever-but I just love my glue gun. The only thing I don't care for is the 'strings' you have to watch out for. I'm a bit of a perfectionist and I will pick every string off of a project. It's just unsightly to show your glue. 

* Scissors, circle cutter, punches, embellishments, chipboard letter, craft paint and paint brush, glitter...anything you might want for your center, IF you want one. There are tons of beautiful wreath tutorials out there without centers. Even some to look like Dahlias. I'm SO doing those next!

* Cardboard or another sturdy base for your rolls

* Mono filament (fishing line), twine, ribbon, string. Anything you like to hang your creation.

* A small square of felt to cover your glued-on hanger

Here is the wreath in all it's glory. Scroll on down to learn how I did it. Again, I'm truly sorry I did not think to take pics during my process. I'll be working on another project soon so I'll make it up to you...promise. In the meantime, search these out on the web. There are some fabulous girls out there with great blogs! (uh...just don't go too far, ok? ;)


Ok, first thing you want to do is roll your book pages. I experimented with the size I wanted. I used a large hardback book. I took it apart first, so that my pages would be free, trimmed off any glue left from the binding, and separated them a little by color. Some older books yellow with age, and I love that, but some of the pages within the same book don't do this. I just sort of flipped through it and separated them. When I had a good pile of pages, I started to roll. Now, this wreath is pretty darn big because I used a large book. The smaller the book, the smaller the wreath, obviously. But, I did try to trim the book pages down a bit to make the wreath a little smaller. You have to trim equally on the bottom and the one side that won't show as much, so that it doesn't look like they've been trimmed. This didn't work out the way I'd hoped. You're better off just using different sized books. And the fact that it was hardback vs paperback does not matter at all. Just get one and start crafting!

Figure out which pages you want to use, like what chapter numbers you like, any pictures, words, titles, etc. Then you roll the paper like a paper cone, starting on one corner. Put a small dab of glue after you make your initial roll to secure, and roll it up. You can go as tight or loose as you want, you'll figure out what you like, and I put a little glue along the ridge where the side of the page lay against the roll. One down, A LOT more to go! Hey, it's meditative...and relaxing! If anything, you'll get a lot of thinking done. Put on some music or catch up on a show while you roll...


Next, is the assembly. You want to cut a circle of cardboard as a base that your rolls will be glued to. Then you want to lay those rolls out before you glue to make sure everything fits. Ok, here's where a leetle frustration might come in. Don't get scared. When you are laying things in a circle, like these rolls of paper, it might take a few tries to get them to lay where you want them. You need to figure out how far 'in' to the circle you need to go to fit them all in snugly and with as few gaps a possible. Sometimes this is near impossible because of the size of your circle and the size/number of your rolls. If you play around with it, it will work out, but you don't want to start gluing until you at least do a dry run first. 

In my photo below do you see how there appears to be two layers of rolls and cardboard? It's the only way I could fill in the gaps that I couldn't fill in with my initial layer. I laid it all out in a way that was pleasing to my eye and that looked even and symmetrical. But, still there were gaps that I couldn't quite fill with more rolls. So, I glued it down this way. Then I identified where the gaps were, flipped the whole thing over, and glued the few extra rolls to the back of the first cardboard circle, to fill it in. I must say, after I was done, the wreath was fuller, and you can't even tell it was a "mistake". I used the mono filament for a hanger. I did use hot glue for this, as well, but you can use tape or anything you like. If you use hot glue, you have to be careful because it will melt your filament. I measured my length of filament so that it would not show while hanging, tied the two ends together a couple of times to get a good sized knot, and put a dab of hot glue right on the cardboard. I let that set up for a few seconds and placed my filament, knot side down, into the glue. I had cut a small square of felt to cover this and glued that down over the knot, as well. Then I made a second cardboard circle to cover the back for aesthetic reasons and glued that right over the second layer of rolls. 

Whew! That part is done!


Here's the back all finished and glued. You could even cover the cardboard with paper or felt if you wanted, but you never see it, so why not save a step? This wreath is work enough, right?


Alright, now for the embellishment. I folded a cute little paper medallion out of a smaller page. I learned how to make these from searching Pinterest and founds this tutorial from cityfarmhouse.com. I didn't use as many pieces of paper, just two, but it was all I needed for this wreath. I just "fan folded" two equal sized pieces of paper, as shown in the tutorial, and glued them together. This time I did use the Tacky glue. I also glued the folds where I felt they might spread out too far. While I let that dry, I made my center. I played around with colors and ideas and settled on this. I used a circle cutter and cut this circle out of black textured cardstock. I put a little Tacky glue on some scrap paper and rolled the edge of the black paper lightly in it, then I rolled it in some vintage German glass glitter. While I let that dry, I used a scalloped paper punch to cut a second circle of cream cardstock. I have a bunch of chipboard letters so I painted our initial with black craft paint. I punched a little butterfly from a piece of the scrap book paper left over and when all the pieces were dry, I assembled it all with Tacky glue. I then glued the finished medallion to the wreath with hot glue. 


Done! I just LOVE it. I recently went to the local antique shop uptown and came across some very old books of sheet music. I have seen a lot of fab projects using old music pages, but wondered where in the world I was going to find some. It was my lucky day, because I came away with a bunch. Can't wait to show you what I do with that!


I really hope you try one of these for yourself. The results are stunning, and it's not really as hard as it looks. And you can start smaller, or just make ornaments for your tree, packages, wall art...it's endless.

I'm so excited about these types of paper projects, I just might dedicate a whole post to introducing you to some fabulous blogs out there with the most beautiful and easy projects to fill your summer with...and get a head start on the holidays! Wouldn't that be nice? Having things done months in advance for Christmastime? Less messin' = less stressin'!

Have a great week and as always, thanks so much for being here. I truly appreciate you.

Nanette